High Availability Article Series #3 - NGINX High Availability Implementation
This article was last updated on: March 10, 2026 am
Previous link
- Part 1 of a highly available series - Overview - Dongfeng Weiming Technology Blog (e-whisper.com)
- High Availability Series Article 2 - Traditional Layered Architecture Technology Solution - Dongfeng Weiming Technology Blog (e-whisper.com)
Four NGINX highly available implementations
For a highly available implementation, the main steps are outlined below:
- Installation and basic configuration of NGINX
- Load balancing layer is highly available: NGINX + Keepalive configuration
- Application service layer highly available: NGINX -> application service layer forwarding configuration
Detailed configuration list of system hardware and software
According to the design of the high-availability architecture of the manufacturing industry and the business requirements, the deployment model is recommended to be configured as follows:
- Server balancing (i.e. NGINX + Keepalived): 2, operating system Linux. The configuration recommendations are as follows:
| Name | Specifications | Notes |
|---|---|---|
| CPU | 2 core | |
| Memory | 4 GB | |
| Hard disk | 50 GB | |
| Operating System | SUSE12 64-bit and patches | |
| Network card | At least 1 network card that supports VRRP technology |
- Software running configuration environment:
| Software | Specifications | |
|---|---|---|
| NGINX | 1.16.1 | |
| Keepalived | 2.0.10 | |
4.1 NGINX Installation and Configuration
4.1.1 Partitions and directories
It is recommended to be divided into at least the following 3 zones:
| Partitions and directories | Size | Notes |
|---|---|---|
Primary partition ( /) |
Default | The nginx program and configuration files are located in this partition (/etc/nginx) |
Log partitions (/var/log/nginx) |
10G-20G | |
Program directory partition (/usr/share/nginx/html) |
10G | Optionally, this directory is required for nginx to be used as a web server. |
4.1.2 Programs and dependent versions
| Program Components | Installation package name | Version | md5 |
|---|---|---|---|
| nginx | nginx-1.16.1-1.sles12.ngx.x86_64.rpm | 1.16.1 | 396A359F26DD0100CD59545BAFFAFE85 |
4.1.3 NGINX Procedure Specification
- nginx program directory:
/etc/nginx - Executor path:
/usr/sbin/nginx - Main configuration file path:
/etc/nginx/conf/nginx.conf - Each application system forwards the configuration file directory:
/etc/nginx/conf.d/ - Log directory:
/var/log/nginx - Static file directories for each application:
/usr/share/nginx/html
4.1.4 System-level configuration optimization
❕ Note:
need
rootUser execution.
- Install the components:
logrotate - To modify the number of connections:
1 | |
- To modify the system kernel configuration:
1 | |
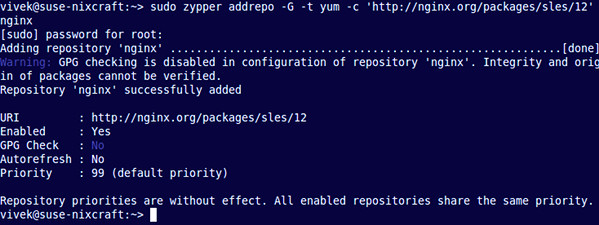
4.1.5 Configuring NGINX repo
❕ Note:
The commands in this section can be operated on the company’s internal repo warehouse machine on a case-by-case basis.
Other machines only need to configure the internal repo address.
Type the following zypper command to add the zypper repository for SLES
1 | |
Next, you must verify the digital signature to maintain the integrity and origin of the downloaded package. Use the wget command to get the nginx signing key:
1 | |
Sample output:
1 | |
Use the rpm command to import the key into rpm:
1 | |
4.1.6 Install NGINX on SUSE
Type the following zypper Command:
1 | |

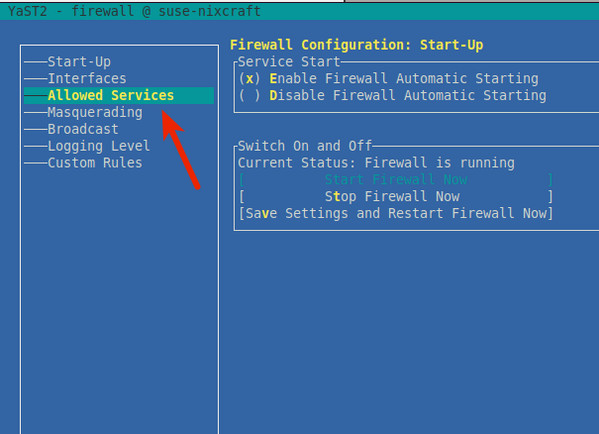
4.1.7 Optional: Configure the firewall
❕ Note:
If there are other dedicated firewalls in the data center traffic ingress, you can disable the firewall on the nginx server without this step.
Start by creating a configuration file for the Nginx specific service, opening port 80 using a text editor such as the vi command:
1 | |
Add the following configuration:
1 | |
(If you don’t need HTTPS support, you only need to allow traffic on TCP port number 80.) Save and exit the VI/VIM text editor. Now, just run the following command to open port 80:
1 | |
Must be used TAB and arrow keys to jump in YaST. In YaST, jump to Allowed Services and press Enter Key:
use TAB Jump to "Allowed Servicesand press the Down Arrow key to select Nginx web serverand press Enter. Must be pressed Alt-A to add the Nginx server to the firewall:
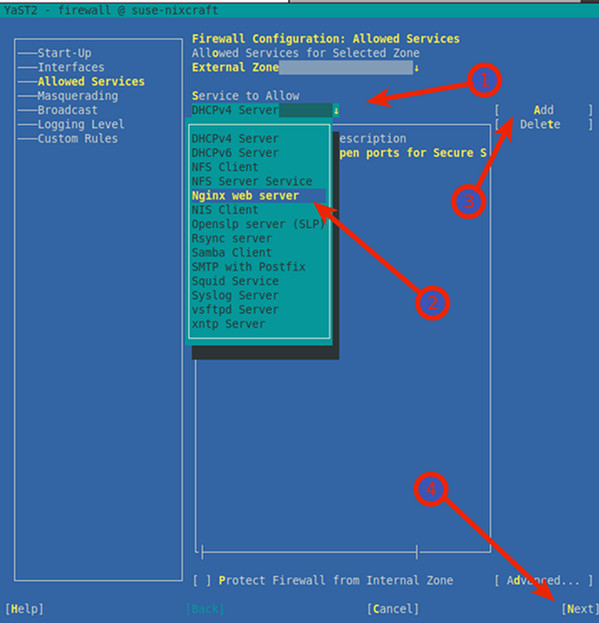
press Alt-N and Alt-F Save and complete the firewall settings on SLES. When the shell prompt is returned, list all iptables rules on SLE:
1 | |
Sample output:
1 | |
Use a combination of the sudo command and the grep command to determine whether port 80 is open:
1 | |
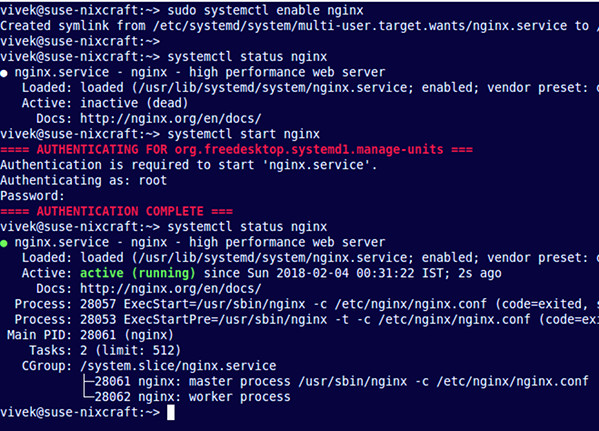
4.1.8 Start NGINX Server
Type the following systemctl command to enable nginx at system startup: (boot-on)
1 | |
Start the NGINX web server:
1 | |
Verify:
1 | |
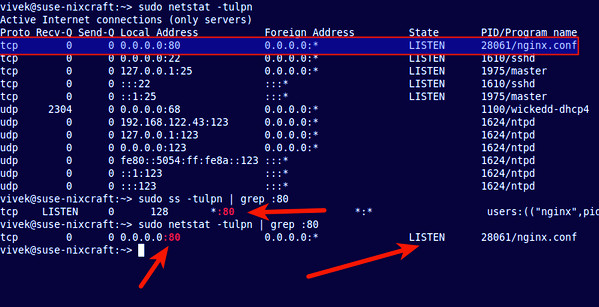
To determine if port 80 is listening, run the following netstat command or ss command:
1 | |
4.1.9 NGINX Basic Operations
Stop it:
1 | |
Initiate:
1 | |
Restart the service:
1 | |
Reload Ngnix after changing the configuration:
1 | |
ℹ Recommendation:
Use after configuration updates
reloadto reload nginx.
Visit the nginx page:
Assume that the NGINX IP is: 192.168.0.1. Use a browser or curl Visit:
http://serve_IP
http://your-domain
http://192.168.0.1
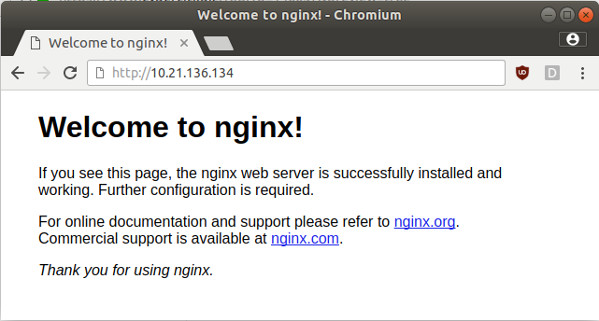
1 | |
Sample output:
HTTP/1.1 200 OK
Server: nginx/1.16.1
Date: Sat, 03 Feb 2020 19:18:53 GMT
Content-Type: text/html
Content-Length: 612
Last-Modified: Tue, 17 Oct 2019 13:30:50 GMT
Connection: keep-alive
ETag: "59e6060a-264"
Accept-Ranges: bytes
4.1.10 Find information about Nginx configuration files on SLES
Now Nginx is up and running. Next, you can customize the configuration.
Server configuration file for SLES:
/etc/nginx/: nginx default configuration directory/etc/nginx/nginx.conf: nginx master profile/etc/nginx/conf.d/default.conf: The configuration of the default virtual host
To modify the Configuration Master:
1 | |
4.1.11 NGINX logs
/var/log/nginx/access.log: Access logs/var/log/nginx/error.log: Error log
4.1.12 nginx.conf
The main configuration file is detailed below:
1 | |
✔ Recommendation:
In order to ensure that the main configuration file is clean. It is recommended to pass
include conf.d/default.conf;Other virtual hosts configurations are introduced in a way like this.
4.1.13 Log dumps
-
sudo vi /etc/logrotate.d/nginx -
Edits:
/var/log/nginx/*.log { daily rotate 90 # 保留90天, 按需调整 create dateext #compress # 是否启用压缩, 按需调整 #minsize 1M #create 0644 nginx nginx # nginx日志所属用户和组, 按需调整 # copytruncate 用于还在打开中的日志文件,把当前日志Backup并截断;是先拷贝再清空的方式,拷贝和清空之间有一个时间差,可能会丢失部分日志数据。 # delaycompress 和compress 一起使用时,转储的日志文件到下一次转储时才压缩 missingok ifempty # default nomail #noolddir # default sharedscripts # 运行postrotate脚本,作用是在所有日志都轮转后统一执行一次脚本。如果没有配置这个,那么每个日志轮转后都会执行一次脚本 postrotate # 在logrotate转储之后需要执行的指令,例如重新启动 (kill -HUP) 某个服务!必须独立成行 if [ -f /var/log/nginx/nginx.pid ]; then kill -USR1 `cat /var/log/nginx/nginx.pid` fi endscript } -
Force to run once to test:
logrotate -f -v /etc/logrotate.d/nginx(The corresponding directory can only have user with w permission, otherwise an error will be reported) -
Just configure it, logrotate will automatically read it
/etc/logrotate.dand automate the configuration.
📓 Remark:
cron.daily will be
3:22+(5,45)This time period is executed
4.2 NGINX + Keep Lived configuration
ℹ Assumption:
Assume that the relevant IP addresses are as follows:
- VIP: 192.168.0.100
- NGINX - Main IP: 192.168.0.1
- NGINX - From IP: 192.168.0.2
- NGINX - The NIC corresponding to the master-slave IP address is
eth0
4.2.1 Keepalived installation configuration
1 | |
4.2.2 Keepalived configuration
Keep alive starts reading the configuration file path by default /etc/keepalived/keepalived.conf to add a configuration file:
1 | |
NGINX - Primary The machine configuration is as follows:
1 | |
The configuration instructions are as follows:
-
weight -20: keepalived configurationpriority 110is the initial weight; The primary one is initially set to 110, the standby one is set to 100, and if the detection fails, the weight is -20. Master-slave switching. -
virtual_router_id 51The ID of the self-defined virtual route.vrrp_instance VI_1blockvirtual_router_idThe value of 51 for the directive is an example value; Change it as needed to make it unique in your environment. -
Add to
NGINX - from The machine configuration is as follows:
1 | |
4.2.3 Configure the detection script
❕ Notes:
use
rootuser
Configure the detection script: /etc/keepalived/nginx_pid.sh
1 | |
Grant execute permissions: chmod 750 /etc/keepalived/nginx_pid.sh
4.2.4 Start Keepalived
Type the following systemctl command to enable keepalive at system startup: (boot-on)
1 | |
Start the NGINX web server:
1 | |
Verify:
1 | |
4.2.4 Display node status
To see which node is currently the primary node for a given VIP, run the command on the interface that defines the VRRP instance ip addr show(In the following command,eth0nodesuse12-1and interfaces on suse12-2):
suse12-1 # ip addr show eth0
2: eth0: <BROADCAST,MULTICAST,UP,LOWER_UP> mtu 1500 qdisc pfifo_fast state
     UP qlen 1000
    link/ether 52:54:00:33:a5:a5 brd ff:ff:ff:ff:ff:ff
    inet 192.168.0.1/24 brd 192.168.0.255 scope global dynamic eth0
       valid_lft 3071sec preferred_lft 3071sec
    inet 192.168.0.100/32 scope global eth0
       valid_lft forever preferred_lft forever

suse12-2 # ip addr show eth0
2: eth0: <BROADCAST,MULTICAST,UP,LOWER_UP> mtu 1500 qdisc pfifo_fast state
     UP qlen 1000
    link/ether 52:54:00:33:a5:87 brd ff:ff:ff:ff:ff:ff
    inet 192.168.0.2/24 brd 192.168.0.255 scope global eth0
       valid_lft forever preferred_lft forever
In this output, the second line inet denote suse12-1 is the master node to which a defined VIP has been assigned (192.168.0.100)。inet Other lines in the output show the actual IP address of the master node (192.168.0.1) and the IP address of the standby (or slave) node (192.168.0.2)。
So far, nginx + keepalivedThe load balancing layer is highly availableThe configuration is complete.
4.3 NGINX -> Application Service Layer forwarding configuration
ℹ Assumption:
Suppose the application system is related to the following:
- The request and business protocol is HTTP protocol;
- The IP address of application node 1 is: 172.30.0.1
- The IP address of application node 2 is: 172.30.0.2
- The listening port of the service system is: 8080
4.3.1 Modify the configuration file
Take the high-availability configuration of the mes system as an example (the protocol is HTTP protocol), it is added /etc/nginx/conf.d/mes.conf:
1 | |
4.3.2 Main configuration file include
Add the following content to the HTTP block
1 | |
4.3.2 Reload nginx
Reload Ngnix after changing the configuration for the configuration to take effect:
sudo systemctl reload nginx
4.3.3 Verification
Access through the VIP, view the corresponding application system logs, and observe whether both nodes receive requests.
5. Change control process
❗ Strictly follow the change control specifications of manufacturing companies. Conduct relevant change control and approval processes.
A new application needs to be launched or changed, which usually involves the following steps:
Changes that can be implemented at any time:
- The system project team must provide at least the port, path, and backend address (domain name is optional);
- at
/etc/nginx/conf.dAdd a configuration file; - at
/etc/nginx/nginx.confAdd oneincludeto point to the newly added configuration file;
❗ Changes that need to be made in the change window:
- Reload (
sudo systemctl reload nginx) configuration. - Inform the user that the IP of the server accessed is adjusted from the original application server IP to the VIP of NGINX.
- Modify the client and browser configuration, and adjust the server IP of the original application server to the VIP of NGINX.
- Verify that the change was successful.
5.1 Rollback Steps
Fallback is simpler, the steps are as follows:
- Notify the user that the accessed server IP is adjusted to: original application server IP.
- Modify the client and browser configuration, adjust the access server IP to: original application server IP.
- The fallback is complete
- Verify that the fallback was successful.
Reference documents
| Reference files |
|---|
| High Availability Support for NGINX |